Creating a RecyclerView List
Creating a RecyclerView List
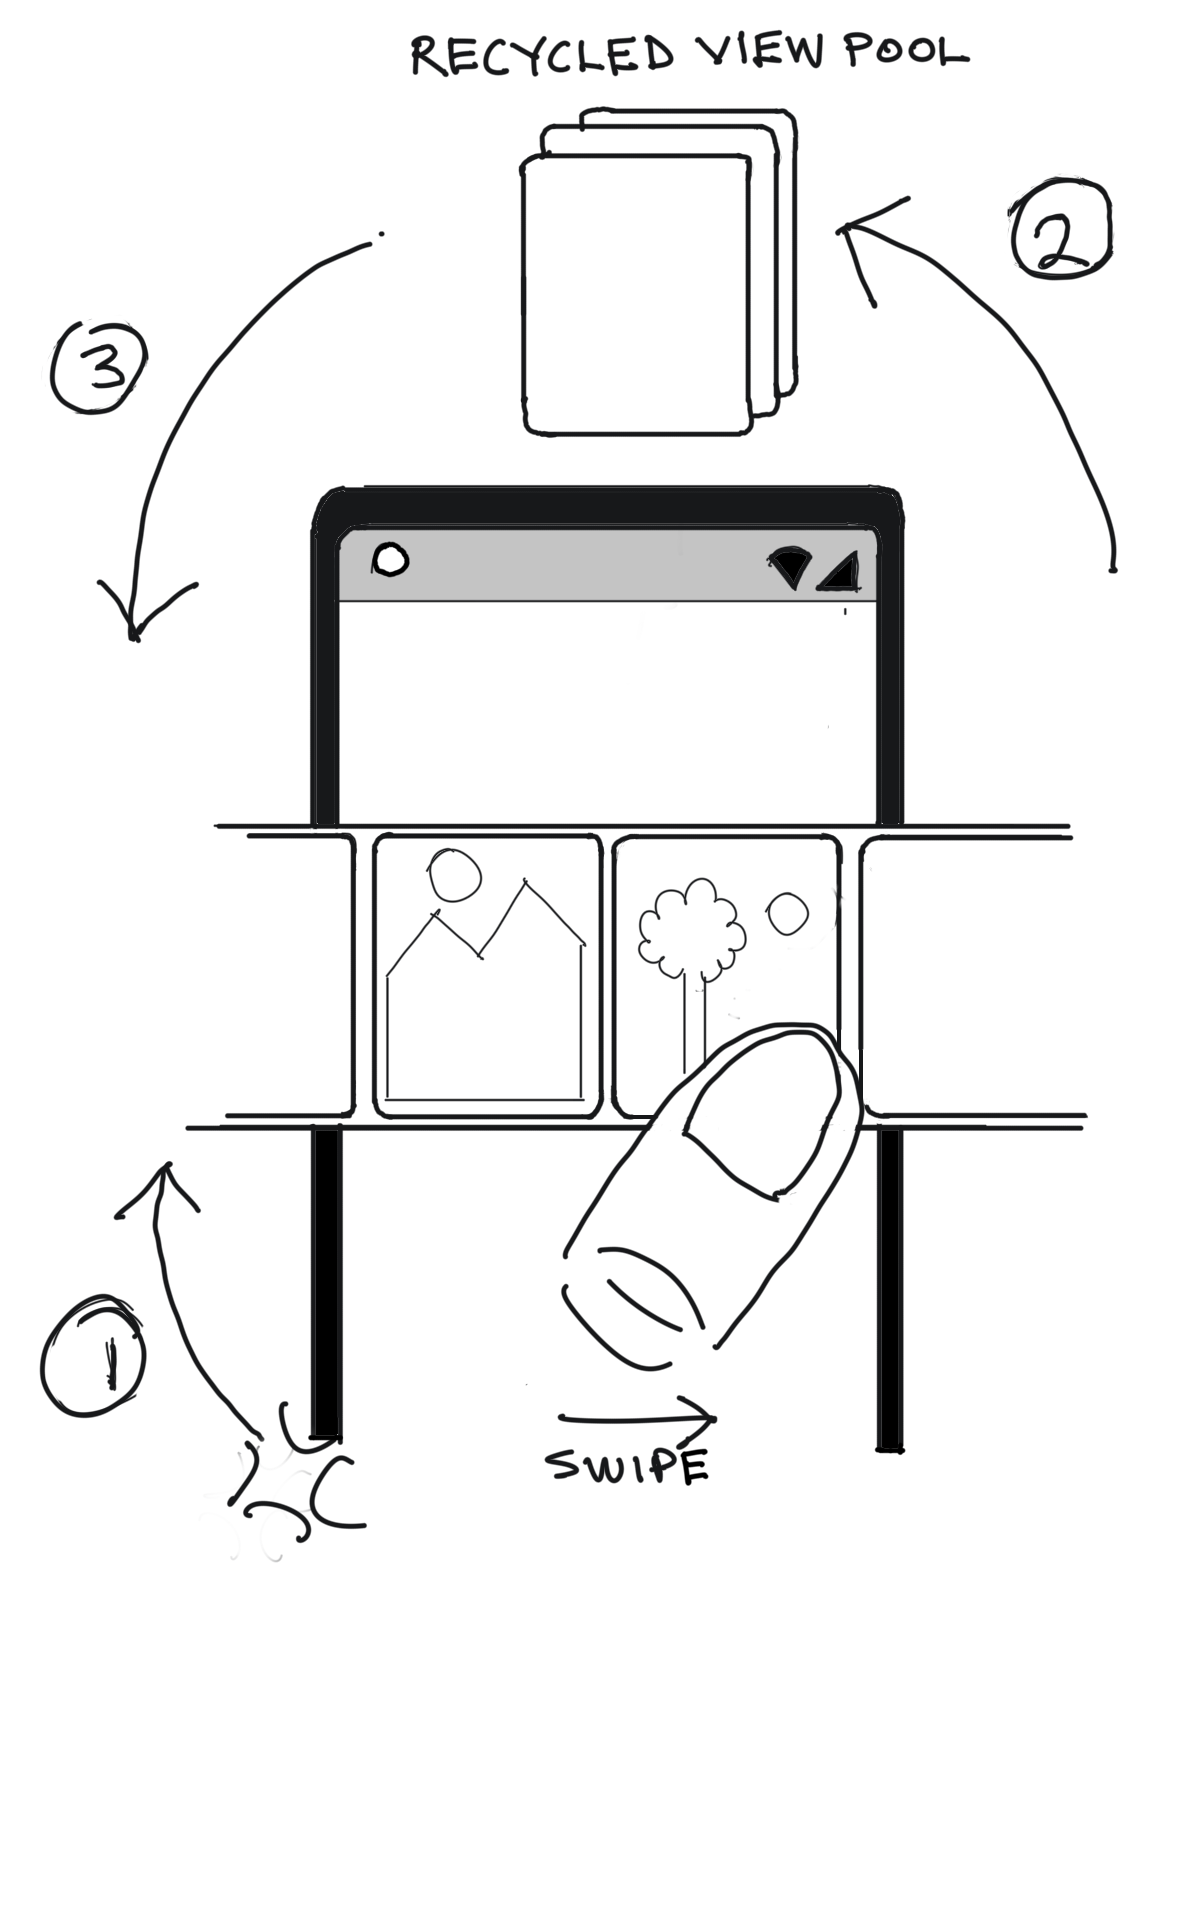
In this chapter we are going to create a list of items using the RecyclerView. The RecyclerView is an efficient way to display a large list of elements. It optimizes the use of system resources by recycling elements when they scroll off the screen and are no longer in view. When an element scrolls off the screen it is not destroyed but placed in a pool so that it can be reused once it is scrolled back on screen.
-
To begin with the RecyclerView creates a small set of views based on the number of items that can be display on the screen at a time. These views are created using the
onCreateViewHolder()method. -
When you swipe the RecyclerView the element that is about to move out of view is placed in the RecycleView pool by calling the
onViewRecycled()method. -
Similarly, once the user scrolls and a view is about to be visible it is pulled from the RecyclerView pool by calling the
onBindViewHolder()to bind the view with its data. If the view is not available in the RecyclerView pool then theonCreateViewHodler()instead.
The main components of the RecyclerView are the
- RecyclerView
- RecyclerView Adapter
- LayoutManager
- ViewHolder
- Data
The adapter is the engine that takes an item view and passes to the the LayoutManager to be displayed.
The LayoutManager is responsible for managing how the views are laid out on a screen. For instance the view can be laid out horizontally or vertically.
The ViewHolder, as the name suggests, holds an item and its data.
The RecyclerView class brings everything together to display a list of data on screen-full at a time.
Implementing a RecyclerView
To implement a RecyclerView, you’ll need to implement to following steps.
- Add RecyclerView dependency to your gradle.build file
- Add RecyclerView to your layout XML file
- Create an individual item XML file
- Create a ViewHolder
- Create an Adapter
- Instantiate the RecyclerView
- Run your app
Adding the dependency to the gradle.build file
The code listing below shows the gradle.build file located in the “/app” directory. Pay particular attention to line in the dependencies section where we add the statement implementation 'androidx.constraintlayout:constraintlayout:2.0.4'. This is where we add the RecyclerView dependency.
{lang=”gradle”}
apply plugin: 'com.android.application'

android {
    compileSdkVersion 29
    buildToolsVersion "30.0.0"

    defaultConfig {
        applicationId "com.budu3.recyclerviewapp"
        minSdkVersion 25
        targetSdkVersion 29
        versionCode 1
        versionName "1.0"

        testInstrumentationRunner "androidx.test.runner.AndroidJUnitRunner"
    }

    buildTypes {
        release {
            minifyEnabled false
            proguardFiles getDefaultProguardFile('proguard-android-optimize.txt'), 'proguard-rules.pro'
        }
    }

}

dependencies {
    implementation fileTree(dir: 'libs', include: ['*.jar'])
    implementation 'androidx.recyclerview:recyclerview:1.1.0'
    implementation 'androidx.appcompat:appcompat:1.2.0'
    implementation 'androidx.constraintlayout:constraintlayout:2.0.4'
    testImplementation 'junit:junit:4.12'
    androidTestImplementation 'androidx.test.ext:junit:1.1.2'
    androidTestImplementation 'androidx.test.espresso:espresso-core:3.3.0'
}
Adding RecyclerView to your activity’s layout
We will then create the layout for our app by creating the activity_main.xml and fragment_home.xml files. The activity_main.xml file will call our fragment_home.xml which contains our RecyclerView widget. In the activity_main.xml code listing below, pay particular attention the <androidx.recyclerview.widget.RecyclerView /> tag. This is where the widget is added.
{lang=”xml”}
<?xml version="1.0" encoding="utf-8"?>
<androidx.constraintlayout.widget.ConstraintLayout xmlns:android="http://schemas.android.com/apk/res/android"
    xmlns:app="http://schemas.android.com/apk/res-auto"
    android:id="@+id/container"
    android:layout_width="match_parent"
    android:layout_height="match_parent">

    <com.google.android.material.bottomnavigation.BottomNavigationView
        android:id="@+id/nav_view"
        android:layout_width="0dp"
        android:layout_height="wrap_content"
        android:layout_marginStart="0dp"
        android:layout_marginEnd="0dp"
        android:background="?android:attr/windowBackground"
        app:layout_constraintBottom_toBottomOf="parent"
        app:layout_constraintLeft_toLeftOf="parent"
        app:layout_constraintRight_toRightOf="parent"
        app:menu="@menu/bottom_nav_menu" />

    <fragment
        android:id="@+id/nav_host_fragment"
        android:name="androidx.navigation.fragment.NavHostFragment"
        android:layout_width="match_parent"
        android:layout_height="match_parent"
        app:defaultNavHost="true"
        app:layout_constraintBottom_toTopOf="@id/nav_view"
        app:layout_constraintLeft_toLeftOf="parent"
        app:layout_constraintRight_toRightOf="parent"
        app:layout_constraintTop_toTopOf="parent"
        app:navGraph="@navigation/mobile_navigation" />

</androidx.constraintlayout.widget.ConstraintLayout>
{lang=”xml”}
<?xml version="1.0" encoding="utf-8"?>
<ScrollView xmlns:android="http://schemas.android.com/apk/res/android"
    xmlns:app="http://schemas.android.com/apk/res-auto"
    android:layout_width="match_parent"
    android:layout_height="match_parent">

    <LinearLayout
        android:id="@+id/container"
        android:layout_width="match_parent"
        android:layout_height="match_parent"
        android:background="#070707"
        android:orientation="vertical">

        <ImageView
            android:id="@+id/imageView2"
            android:layout_width="51dp"
            android:layout_height="51dp"
            android:layout_gravity="left"
            android:layout_marginLeft="20dp"
            app:srcCompat="@drawable/myflix_icon" />


        <ImageView
            android:id="@+id/imageView3"
            android:layout_width="match_parent"
            android:layout_height="139dp"
            app:srcCompat="@drawable/main" />

        <TextView
            android:id="@+id/textView3"
            android:layout_width="match_parent"
            android:layout_height="wrap_content"
            android:text="Favorites"
            android:textColor="#FFFFFF"
            android:textSize="24sp" />

        <androidx.recyclerview.widget.RecyclerView
            android:id="@+id/fav_recyclerview"
            android:layout_width="match_parent"
            android:layout_height="match_parent" />


        <TextView
            android:id="@+id/textView4"
            android:layout_width="match_parent"
            android:layout_height="wrap_content"
            android:text="Drama"
            android:textColor="#FFFFFF"
            android:textSize="24sp" />

        <androidx.recyclerview.widget.RecyclerView
            android:id="@+id/drama_recyclerview"
            android:layout_width="match_parent"
            android:layout_height="match_parent" />

        <TextView
            android:id="@+id/textView2"
            android:layout_width="match_parent"
            android:layout_height="wrap_content"
            android:text="Comedy"
            android:textColor="#FFFFFF"
            android:textSize="24sp" />

        <androidx.recyclerview.widget.RecyclerView
            android:id="@+id/comedy_recyclerview"
            android:layout_width="match_parent"
            android:layout_height="match_parent" />

        <TextView
            android:id="@+id/text_gallery"
            android:layout_width="match_parent"
            android:layout_height="wrap_content"
            android:textAlignment="center"
            android:textSize="20sp" />

        <TextView
            android:id="@+id/text_home"
            android:layout_width="match_parent"
            android:layout_height="wrap_content"
            android:layout_marginStart="8dp"
            android:layout_marginTop="8dp"
            android:layout_marginEnd="8dp"
            android:textAlignment="center"
            android:textSize="20sp"
            app:layout_constraintBottom_toBottomOf="parent"
            app:layout_constraintEnd_toEndOf="parent"
            app:layout_constraintStart_toStartOf="parent"
            app:layout_constraintTop_toTopOf="parent" />

    </LinearLayout>
</ScrollView>
Adding a Layout File for your Item
We will now create a layout file for the individual items in our RecyclerView by creating the recyclerview_row.xml file. In our case, each item is a movie listing. The code listing below shows the contents of recyclerview_row.xml file.
{lang=”xml”}
<?xml version="1.0" encoding="utf-8"?>
<LinearLayout xmlns:android="http://schemas.android.com/apk/res/android"
    xmlns:app="http://schemas.android.com/apk/res-auto"
    android:layout_width="150dp"
    android:layout_height="match_parent"
    android:padding="1dp">

    <ImageView
        android:id="@+id/imageView"
        android:layout_width="80dp"
        android:layout_height="wrap_content"
        android:layout_weight="1"
        android:paddingLeft="1dp"
        app:srcCompat="@drawable/tt38" />
</LinearLayout>
Create a Data class
The following code listing is the Java class to create each of our data elements that will be inserted into our RecyclerView. In our case each data element contains a movie thumbnail and it associated title.
{lang=”java”}
package com.thebook.bottomnav.ui.home;

public class SimpleViewModel {
    private String poster;
    private String title;

    public int getImage() {
        return image;
    }

    public void setImage(int image) {
        this.image = image;
    }

    private int image;

    public void setPoster(String poster) {
        this.poster = poster;
    }

    public void setTitle(String title) {
        this.title = title;
    }

    public String getPoster() {
        return poster;
    }

    public String getTitle() {
        return title;
    }
    /*
    public void ViewModel(String poster, String title){
            this.poster = poster;
            this.title = title;
    }
    */
    public void SimpleViewModel(String title, int image){
        this.image = image;
        this.title = title;
    }

}
In the code listing below pay close attention to the
Create a RecyclerView Adapter Class
The code listing below is our ReclyclerView Adapter class which extends RecyclerView.Adapter class and we implement the onCreateViewHolder, onBindViewHolder and getItemCount methods.
Create a ViewHolder
In the code listing bleow pay close attention to the public class ViewHolder extends RecyclerView.ViewHolder implements View.OnClickListener {...} class.
It then implements the View.OnClickListener class. The listener listens for an onClick event.
{lang=”java”}
package com.thebook.bottomnav.ui.home;

import android.content.Context;
import android.view.LayoutInflater;
import android.view.View;
import android.view.ViewGroup;
import android.widget.ImageView;
import android.widget.TextView;

import com.thebook.bottomnav.R;

import java.util.ArrayList;
import java.util.List;

//import androidx.lifecycle.ViewModel;
import androidx.recyclerview.widget.RecyclerView;

public class RecyclerViewAdapter extends RecyclerView.Adapter<RecyclerViewAdapter.ViewHolder> {

    private ArrayList<SimpleViewModel> data;
    private LayoutInflater layoutInflater;
    private ItemClickListener mClickListener;

    // data is passed into the constructor
    RecyclerViewAdapter(Context context, ArrayList<SimpleViewModel> data) {
        this.layoutInflater = LayoutInflater.from(context);
        this.data = data;
    }

    // inflates the row layout from xml when needed
    @Override
    public ViewHolder onCreateViewHolder(ViewGroup parent, int viewType) {
        View view = layoutInflater.inflate(R.layout.recyclerview_item, parent, false);
        return new ViewHolder(view);
    }

    // binds the data to the TextView in each row
    @Override
    public void onBindViewHolder(ViewHolder holder, int position) {
        SimpleViewModel movie = data.get(position);
        //holder.myTextView.setText(movie.getTitle());
        holder.myImageView.setImageResource(movie.getImage());
    }

    // total number of rows
    @Override
    public int getItemCount() {
        return data.size();
    }

    // stores and recycles views as they are scrolled off screen
    public class ViewHolder extends RecyclerView.ViewHolder implements View.OnClickListener {

        TextView myTextView;
        ImageView myImageView;

        ViewHolder(View itemView) {
            super(itemView);
            //myTextView = itemView.findViewById(R.id.tvMovieName);
            myImageView = itemView.findViewById(R.id.imageView);
            itemView.setOnClickListener(this);
        }

        @Override
        public void onClick(View view) {
            if (mClickListener != null) mClickListener.onItemClick(view, getAdapterPosition());
        }
    }

    // convenience method for getting data at click position
    SimpleViewModel getItem(int id) {
        return data.get(id);
    }

    // allows clicks events to be caught
    void setClickListener(ItemClickListener itemClickListener) {
        this.mClickListener = itemClickListener;
    }

    // parent activity will implement this method to respond to click events
    public interface ItemClickListener {
        void onItemClick(View view, int position);
    }
}
Create an Activity class
We then call our call our RecyclerView in the HomeFragment.java file.
{lang=”java”}
package com.thebook.bottomnav.ui.home;

import android.content.Context;
import android.os.Bundle;
import android.util.Log;
import android.view.LayoutInflater;
import android.view.View;
import android.view.ViewGroup;
import android.widget.ImageView;
import android.widget.TextView;
import android.widget.Toast;

import androidx.annotation.NonNull;
import androidx.annotation.Nullable;
import androidx.fragment.app.Fragment;
import androidx.lifecycle.Observer;
import androidx.lifecycle.ViewModelProviders;
import androidx.navigation.Navigation;
import androidx.recyclerview.widget.LinearLayoutManager;
import androidx.recyclerview.widget.RecyclerView;

import com.thebook.bottomnav.R;

import org.json.JSONArray;
import org.json.JSONException;
import org.json.JSONObject;

import java.util.ArrayList;
import java.util.Collections;
import java.util.Random;

public class HomeFragment extends Fragment implements RecyclerViewAdapter.ItemClickListener{

    private HomeViewModel homeViewModel;
    private ImageView imageView;
    private  RecyclerView recyclerView;
    private RecyclerView recyclerViewDrama;
    private RecyclerViewAdapter adapter;
    private RecyclerViewAdapter adapterDrama;
    private HomeFragment home;
    public View onCreateView(@NonNull LayoutInflater inflater,
                             ViewGroup container, Bundle savedInstanceState) {

        ArrayList<SimpleViewModel> movieList = new ArrayList<>();

        homeViewModel =
                ViewModelProviders.of(this).get(HomeViewModel.class);
        final View root = inflater.inflate(R.layout.fragment_home, container, false);
        final TextView textView = root.findViewById(R.id.text_home);
        home = this;

        homeViewModel.getArrayList().observe(getViewLifecycleOwner(), new Observer<ArrayList<SimpleViewModel>>() {
            @Override
            public void onChanged(@Nullable ArrayList<SimpleViewModel> movieList) {
                // data to populate the RecyclerView with
                //TODO: consider moving this into the viewmodel, https://askandroidquestions.com/2021/06/15/how-to-load-data-into-a-recyclerview-inside-a-fragment-using-viewmodel/
                //TODO: https://gist.githubusercontent.com/sheharyarn/20f171e900eff32bf38fd8be1d30911d/raw/fdb1bea258fdb11875c80ebc3b3e8d3e0311bbfa/RVFragment.java
                //TODO: add additional recyclerviews

                Context context = getContext();
                recyclerView = root.findViewById(R.id.fav_recyclerview);
                recyclerView.setHasFixedSize(true);
                recyclerView.setLayoutManager(new LinearLayoutManager(context, LinearLayoutManager.HORIZONTAL, false));
                adapter = new RecyclerViewAdapter(context, movieList);
                adapter.setClickListener(home);
                recyclerView.setAdapter(adapter);

                recyclerView = root.findViewById(R.id.drama_recyclerview);
                recyclerView.setLayoutManager(new LinearLayoutManager(context, LinearLayoutManager.HORIZONTAL, false));
                adapter = new RecyclerViewAdapter(context, movieList);
                adapter.setClickListener(home);
                recyclerView.setAdapter(adapter);
                recyclerView.scrollToPosition(2);

                recyclerView = root.findViewById(R.id.comedy_recyclerview);
                recyclerView.setLayoutManager(new LinearLayoutManager(context, LinearLayoutManager.HORIZONTAL, false));
                adapter = new RecyclerViewAdapter(context, movieList);
                adapter.setClickListener(home);
                recyclerView.setAdapter(adapter);
                recyclerView.scrollToPosition(3);
            }
        });
        //TODO: End of viewModel

        //add onClickListener to scrolling images
        /*
        for (int i=4; i<16; i++){
            int id = getResources().getIdentifier("imageView" + i,"id", getActivity().getPackageName());
            ImageView imgView = root.findViewById(id);
            //imgView.setOnClickListener(this);
        }
        */
        return root;
    }

    //@Override
    public void onClick(View view) {
        //todo: pass on movie data for movie selected to the Info Fragment
        String resourceName;
        Bundle bundle = new Bundle();

        resourceName = view.getResources().getResourceName(view.getId()).split("/")[1];
        bundle.putString("id", resourceName);
        Navigation.findNavController(view).navigate(R.id.action_navigation_home_to_navigation_info, bundle);
    }

    @Override
    public void onItemClick(View view, int position) {
        //Toast.makeText(getContext(), "You clicked " + adapter.getItem(position) + " on row number " + position, Toast.LENGTH_SHORT).show();
        Toast.makeText(getContext(), "You clicked  on position number " + position, Toast.LENGTH_SHORT).show();
    }
}
Run your App
The Running your Simple App chapter will walk you through the steps on how to run this example in Android Studio.